Installing Shed Windows and Doors
A practical guide to framing openings, building a ledged and braced door, hanging it on T-hinges, fitting a window and weatherproofing a UK timber shed.
Windows and doors are where a shed either works for years or starts to give you trouble. A door that drops on its hinges, an opening that is out of square, or a window sealed up the wrong way will all let you down. The good news is that none of it is hard once you understand the principles. This guide walks you through framing the openings, building a proper ledged and braced door, hanging it true, fitting a window and weatherproofing the lot, the way a chippy would do it on site.
Get the wall framed square and the shed sitting level before you fit anything. A door is only as good as the hole it hangs in. If the opening is out of true, no amount of fiddling with hinges will give you an even gap and a smooth swing.
Framing the Openings
Both windows and doors sit in a framed opening built into the stud wall. The job of the framing is to carry the load that the removed studs used to carry, and to give you solid, square timber to fix into all the way round.
- Fit the header or lintel - Across the top of the opening, fit a horizontal member (the header, or lintel) to carry the roof load down past the gap. For a small window a single 47mm x 75mm timber is fine; for a wider door, double it up. It rests on the trimmer studs either side.
- Add the trimmer studs - Either side of the opening, fix full-height trimmer studs (sometimes called king studs) running floor to top plate. These take the ends of the header and stiffen the sides of the hole.
- Fit the cripple studs - Inside the trimmers, fit shorter cripple studs (jack studs) that run from the sole plate up to under the header, supporting its ends. Above a window, short cripples also run from the header up to the top plate to keep the stud spacing going.
- Set the sill for a window - For a window, fit a horizontal sill across the bottom of the opening on the cripple studs, giving you something to land the window frame on.
Make the framed opening 8mm to 10mm bigger than the door or window frame all the way round. That margin lets you slide in packers and shims to set the frame dead plumb and square, even if the studwork is a touch out. A frame jammed tight into a snug hole gives you nowhere to adjust.
Building a Ledged and Braced Door
The classic shed door is a ledged and braced door. It is just vertical tongue and groove (T&G) boards held together by horizontal ledges, with diagonal braces to stop it sagging. Simple, strong, and you can build it on a pair of trestles in an afternoon.
- Lay up the boards - Cut your T&G cladding boards to the door height and lay them face down, slotted together, to the door width. Tap them tight so the joints close up.
- Fix the three ledges - Screw three horizontal ledges across the back of the boards: one near the top, one near the bottom, and one in the middle. Keep the top and bottom ledges set in from the ends by 100mm or so to leave room for the braces. Screw and clench, or use clout nails through the boards into the ledges.
- Cut and fit the braces - Fit two diagonal braces between the ledges, running up from the hinge side towards the latch side. Cut them to sit tight between the ledges so they prop the door rather than just sitting on the surface.
- Trim and clean up - Once everything is fixed, run a saw down the latch edge to trim the boards flush and clean to a straight line.
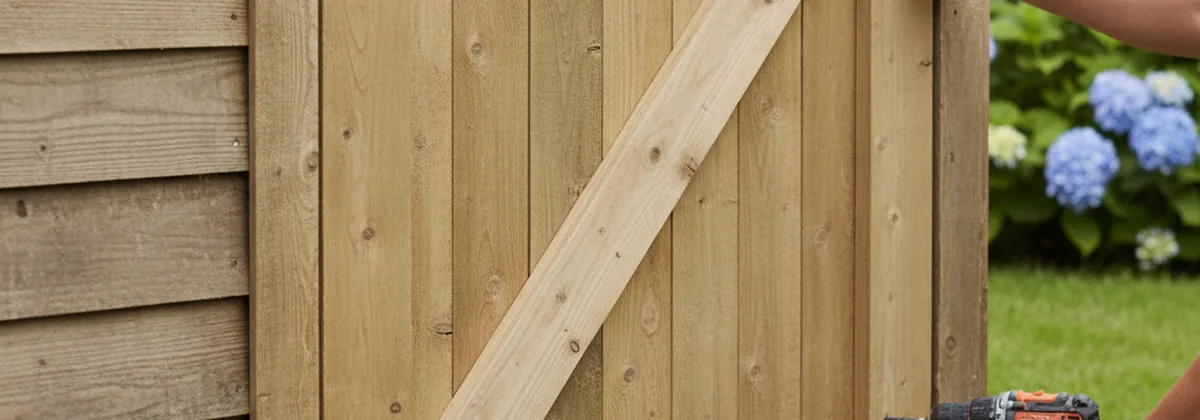
The brace must rise from the bottom hinge corner up towards the top latch corner. Set this way it works in compression and holds the door up. Run it the other way and it sits in tension doing nothing, and the door will drop on its hinges within weeks. Get the direction wrong and the whole point of the brace is lost.
Hanging the Door: Packing, Plumb and Square
Hanging the door well is mostly about patience. You are aiming for an even gap all round and a door that swings smoothly and stays where you put it.
- Offer the door up - Stand the door in the opening on a couple of packers so it sits at the right height, leaving a slightly bigger gap at the bottom to clear any threshold or seal.
- Pack it plumb and square - Slide shims down the hinge side and check the door is plumb in both directions with a spirit level. Set the gap to a consistent 3mm to 5mm down the hinge side and across the top. Hold it with wedges while you work.
- Mark and recess the hinges - Mark the hinge positions, then chop a shallow recess for each hinge leaf with a chisel so the hinge sits flush. On a T-hinge the long tail lands on the door across a ledge; the short leaf goes on the frame.
- Screw off and test the swing - Fix the hinges with the correct galvanised screws, take out the packers, and swing the door. Check the gap stayed even and the door does not bind or drop. Adjust the shims if it does.
If you find the gap is uneven no matter what you do, the fault is almost always the opening rather than the door. Recheck the framing for square before blaming the hinges. A condensation-prone shed will also swell and stick in damp weather, so if you are lining the building, read our guide on how to stop shed condensation as well.
Hinges and the Swing
Two types of hinge cover almost every shed door. The choice comes down to the weight of the door and the look you want.
| Hinge Type | Best For | Strength | Notes |
|---|---|---|---|
| Galvanised T-hinge | Ledged and braced doors | High | Long tail spreads load across the ledge |
| Butt hinge | Framed, lighter doors | Medium | Neat, recessed; use three per door |
| Strap hinge | Heavy double doors | Very high | Long straps both sides, very rigid |
| Hook and band | Field gates, big doors | Very high | Pin on a band, lift-off, heavy duty |
For a standard single shed door, two galvanised T-hinges fixed across the top and bottom ledges are the trade standard. They are cheap, strong, and the long tail spreads the weight so the boards do not pull loose. Always use galvanised or stainless fixings outside; bright steel screws will rust and stain the timber within a season.
Fitting a Fixed or Top Hung Window
Most shed windows are either fixed (sealed shut, cheapest and most weathertight) or top hung (hinged at the top so they open out for ventilation). Either way the frame is set into the opening the same way as a door, then glazed.
Fixed Window
A simple timber frame is packed into the opening and fixed off. The glass or polycarbonate is bedded in and beaded over. It cannot open, so it stays dry and draught-free, but you get no ventilation. Good for tool sheds and stores.
Top Hung Window
The glazed casement is hinged along its top edge to the frame so it swings outward and sheds rain when open. It needs a stay to hold it ajar. Better for a workshop or potting shed where you want to let heat and damp out.
- Pack the frame plumb and square - Set the timber frame into the opening on packers, check it for plumb, level and square, and fix through the packers into the trimmers and sill. Do not over-tighten and pull the frame out of square.
- Bed and fit the glazing - Run a bead of frame sealant into the rebate, press the 4mm glass or polycarbonate pane onto it, then pin timber glazing beads around the inside edge to hold it. The sealant beds the pane and keeps water out.
- Seal the outside correctly - Run sealant around the head and the two sides where the frame meets the cladding. Leave the bottom edge unsealed so any water that gets behind can drain back out.
Weatherproofing the Openings
An opening is a hole in your weatherproof skin, so it needs detailing to throw water away from the joint. Get this right and the timber stays dry; get it wrong and you will be replacing rotten sills and frames in a few years.
- Drip cap over the head - Fit a drip cap or weather bar above the door and window head, sloped outward and lapped over the cladding, so rain running down the wall is thrown clear of the top joint instead of soaking in behind the frame.
- Sloped sill with a drip groove - The sill under a window must slope outward so water runs off, with a drip groove (a small saw kerf or groove on the underside front edge) so water drips clear rather than tracking back along the underside to the wall.
- Sealant in the right places - Seal the head and the sides, never the bottom. Water always finds a way in somewhere, so the rule is to let it back out at the lowest point. A sealed bottom edge traps it against the timber.
It feels wrong to leave a gap, but the bottom of a window or door frame must be left open to drain. If you run a bead of sealant all the way round, any water that gets in (and it will) has no escape and sits in the joint until the timber rots. Seal the top and sides, leave the bottom to weep.
Ironmongery and Security
Finally, the metalwork that keeps the door shut and the shed secure. A shed is a soft target, so a few pounds on decent ironmongery is money well spent.
- Hasp and staple - A galvanised hasp and staple takes a padlock and is the basic shed lock. Fit a quality one with concealed or clutch-head screws so the fixings cannot simply be undone.
- Pad bolt - A pad bolt (a sliding bolt that takes a padlock) holds the door firmly shut and adds a second locking point, which helps stop the door being levered.
- Hinge bolts - Fit hinge bolts (dog bolts) on the hinge edge. These steel pegs locate into the frame as the door closes, so even if the hinges are attacked the door stays put on that edge.
Spread the locking points so the door is held top, middle and bottom, not just at one spot a thief can lever. For more on protecting the contents, see our shed security tips. If you are still at the design stage, our shed builder tool will help you plan the openings and produce a materials list to match.
Common Mistakes to Avoid
If the framed hole is not square, you will never get an even gap or a clean swing. Check the diagonals are equal and the studs are plumb before you hang anything.
A brace running down from the hinge side does nothing. It must rise from the hinge side up to the latch side to prop the door in compression, or it will drop.
Without a drip cap or weather bar above the opening, rain running down the wall soaks straight into the top joint and rots the frame from the head down.
A bead of sealant all the way round a frame traps any water that gets in. Leave the bottom edge open to drain, or the sill will rot from the inside.
Summary
Fitting windows and doors to a timber shed is straightforward if you respect a few key rules:
- Frame the opening with a header, trimmer studs and cripple studs, 8mm to 10mm bigger than the frame for packing
- Build the door from T&G boards on three ledges, with braces rising from the hinge side so it cannot drop
- Hang it packed plumb and square with an even 3mm to 5mm gap, on galvanised T-hinges or butt hinges
- Fit the window bedded on sealant and held with glazing beads, plumb and square in its opening
- Weatherproof with a drip cap over the head and a sloped sill, sealing the top and sides but never the bottom
- Secure the door with a hasp, pad bolt and hinge bolts spread across its height
Take your time on the square and the packing and the rest follows. A door hung true and a window detailed to shed water will serve you for the life of the shed.
Planning Your Shed Build?
Use our free shed builder tool to design your shed, set out the door and window openings, and get a complete materials list to match.
Start Building Now