How to Insulate a Shed: Floor, Walls and Roof
A practical guide to insulating a timber shed or garden office for year-round comfort. Covers floor, walls, roof, vapour control, breather membranes and draughtproofing.
A bare timber shed is fine for a mower and a few tools, but the moment you want to use the space in winter, or as a year-round workspace, insulation becomes essential. Done properly, insulating the floor, walls and roof turns a cold, damp box into a comfortable room that holds its heat and stays dry. Done badly, it traps moisture and rots the timber from the inside. This guide explains how to insulate a timber shed or garden office correctly, with the layers in the right order and on the right side.
Insulation is only as good as the building it sits in. Make sure the roof is watertight, the cladding sheds water, and the shed sits on a dry, level base. Fixing leaks first will save you tearing out soggy insulation later.
Why Insulate, and the Role of Condensation
Insulation slows the movement of heat. In winter it keeps the warmth you have paid to generate inside the room, and in summer it slows the build-up of heat from the sun. The result is a more stable, comfortable temperature and much lower running costs for a heater or air conditioner.
Just as important, and often overlooked, is managing condensation. Warm air holds more moisture than cold air. Inside a heated, occupied shed the air is warm and damp from your breath, a kettle, or a heater. When that air touches a cold surface, such as the inside of single-skin cladding, it cools and releases its moisture as condensation. Over time this dampness causes mould, musty smells and timber decay.
Good insulation keeps internal surfaces warmer, so the air is less likely to reach the temperature at which it condenses. But insulation alone is not enough: you also have to control where moisture can travel within the structure. That is the job of vapour control layers and breather membranes, covered below.
Insulation Materials Compared
Most shed and garden room insulation comes down to four common materials. The right choice depends on how much depth you have in the studs and rafters, your budget, and how easy you want the job to be.
| Material | R-value per 25mm | Cost | Ease of Fitting |
|---|---|---|---|
| PIR board | High (approx 1.1 to 1.2) | £££ | Medium: cut to fit snugly |
| Mineral wool | Medium (approx 0.6 to 0.7) | £ | Easy: friction-fits, flexible |
| Multifoil | Low to medium (needs air gaps) | ££ | Easy: thin, but needs gaps both sides |
| EPS board | Medium (approx 0.7) | ££ | Medium: lightweight, cut to fit |
PIR (the rigid foil-faced foam board) gives the most insulation for the least thickness, which is why it is the usual choice when stud depth is tight. Mineral wool is cheaper, fits awkward gaps easily and adds useful sound deadening, but needs more thickness for the same effect. Multifoil is thin and handy where space is very limited, but it only performs well with an air gap on both sides, so do not rely on it as your only insulation. EPS is a budget rigid board, lighter than PIR but less efficient.
In a typical shed with 38mm to 50mm studs, plan for 25mm to 50mm of PIR in the walls. A purpose-built log cabin or garden office with deeper studs can take 75mm to 100mm, which makes a noticeable difference to comfort. Always use as much as the frame depth comfortably allows.
Vapour Control and Breather Membranes
This is the part people get wrong, so it is worth understanding before you buy a thing. Two different membranes do two different jobs, and they live on opposite faces of the wall.
Vapour Control Layer (warm inside face)
A vapour control layer, or VCL, is a sheet that resists the passage of moisture. It goes on the warm inside face of the insulation, directly behind the internal lining. Its job is to stop warm, moist room air from drifting into the insulation and timber, where it would cool down and condense. Foil-faced PIR with taped joints can act as its own VCL; with mineral wool you add a separate polythene or foil VCL.
Breather Membrane (cold outside face)
A breather membrane is water-resistant from the outside but vapour-open, meaning it lets any moisture inside the structure escape outward. It goes on the cold outside face, behind the cladding. It keeps wind-driven rain off the frame while letting the wall dry to the outside.
Put simply: vapour control to the warm side, breather membrane to the cold side. Get them the wrong way round and you trap moisture inside the wall. This trapped dampness inside the structure is called interstitial condensation, and it is the main cause of rot in poorly built garden rooms. Keeping the VCL continuous and well sealed on the inside, while letting the wall breathe to the outside, is what prevents it.
Never seal both faces of the wall with a vapour-tight layer. If moisture cannot escape in either direction it will sit in the timber and rot it. The wall must be able to dry to the outside through the breather membrane.
Insulating the Floor
Heat is lost downward through an uninsulated floor, and a cold floor makes a room feel chilly no matter how warm the air is. The floor is best done first, before walls and roof, because the wall insulation sits on top of the finished deck.
- Fit insulation between the joists - Cut PIR board to fit snugly between the floor joists, or friction-fit mineral wool. Support rigid board on battens or proprietary clips so it sits flush with the top of the joists.
- Seal the gaps - With PIR, fill any small gaps around the edges with expanding foam or foil tape so there are no cold bridges or air paths.
- Lay a vapour control layer - Roll a VCL over the top of the joists and insulation, lapping joints and turning it up at the walls so it can later connect to the wall VCL.
- Fix the floor deck - Screw down a new floor deck of 18mm OSB or tongue-and-groove (T&G) chipboard over the VCL. This gives a solid, level surface and protects the insulation below.
If the original shed floor is in good condition you can sometimes insulate from below or build the new deck up on battens, but the cleanest result comes from insulating between the joists and decking over the top.
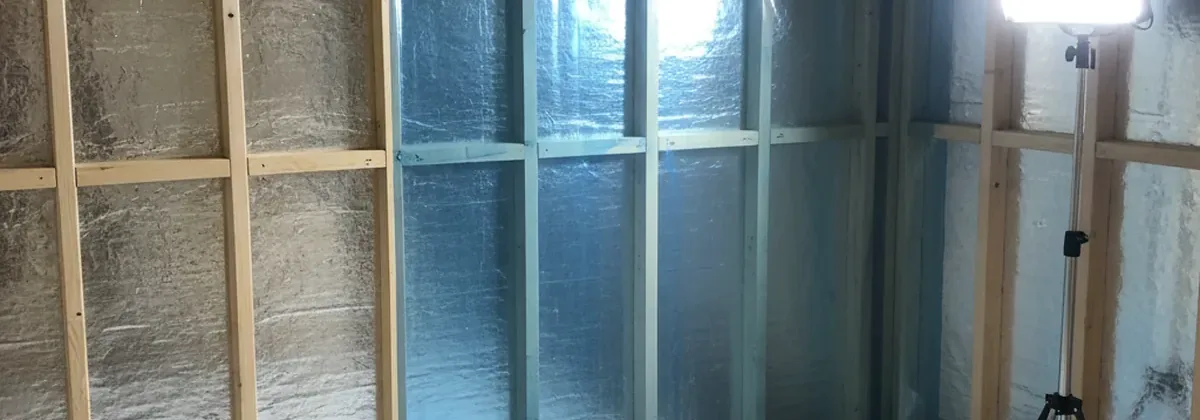
Insulating the Walls
The walls are usually the largest surface area and where you will feel the biggest comfort improvement. The principle is simple: insulation between the studs, breather membrane on the cold side, vapour control on the warm side.
- Check the breather membrane - On the outside, behind the cladding, there should be a breather membrane. Many sheds do not have one. If yours lacks it and you have the cladding off, fit one now so the wall can dry outward.
- Fit insulation between the studs - Cut PIR to fit tightly between the studs, or push mineral wool batts in so they fill the cavity without gaps or compression. Aim for the insulation to sit flush with the inner face of the studs.
- Seal the edges - With PIR, run a bead of expanding foam or foil tape around every edge to close cold bridges and stop air leaking around the boards.
- Add the vapour control layer - Staple a continuous VCL across the inside face of the studs, over the insulation. Lap and tape all joints and seal it to the floor and ceiling VCL for an unbroken barrier.
In a typical shed frame you will be limited to 25mm to 50mm of PIR by the stud depth. If you are building from scratch or can deepen the studs, more insulation always pays off in comfort and running costs.
Insulating the Roof
A surprising amount of heat is lost through the roof, so it is worth insulating well. There are two recognised approaches: a cold roof and a warm roof. The key difference is where the insulation sits and whether there is a ventilation gap.
Cold Roof (with a ventilation gap)
In a cold roof, insulation goes between the rafters but you deliberately leave an air gap above it, between the top of the insulation and the underside of the roof deck. This ventilation gap, typically at least 25mm to 50mm and open to the outside air at the eaves, lets any moisture that reaches the cold deck dry away rather than sitting and rotting the timber. If you fill the rafters completely with no gap, you remove that escape route, so the gap is not optional in a cold roof.
Warm Roof (insulation above or continuous)
In a warm roof, the insulation is continuous over the rafters (or the rafters are fully filled and topped with rigid board) so the whole structure stays on the warm side of the insulation. There is no ventilation gap because no part of the timber is left cold enough to condense moisture. A warm roof gives the best thermal performance and avoids cold-bridging through the rafters, but it raises the roof height and is more involved to build.
- Decide cold or warm - For a retrofit on an existing roof, a cold roof with a ventilation gap is usually simplest. For a new build or a top-spec garden office, consider a warm roof.
- Fit the insulation - For a cold roof, fix PIR between the rafters leaving the ventilation gap above. For a warm roof, fill the rafters and add a continuous layer of rigid board across them.
- Keep the gap clear - On a cold roof, make sure the air gap stays open and vented at the eaves. Do not block it with stuffed insulation.
- Add the vapour control layer - Fit a VCL on the warm underside, taped and sealed to the wall VCL, before lining the ceiling.
Lining the Interior
With insulation and the vapour control layer in place, line the inside to give a finished, durable surface and to hold everything tight.
- OSB - tough, cheap and great if you want to fix shelves or tools anywhere on the wall.
- Plywood - cleaner finish than OSB, paintable, slightly more expensive.
- Plasterboard - the most house-like finish, ready to skim or paint, but heavier and more prone to damage knocks.
Fix the lining through to the studs and rafters, taking care not to puncture or tear the vapour control layer any more than the fixings require. For a workspace such as a garden office, plasterboard or painted ply gives a bright, professional finish.
If you are running power, lighting or a heater, have the electrics installed or signed off by a qualified electrician. Keep cables clear of being crushed against rigid insulation, and never enclose a heater or fittings in a way that risks overheating. Plasterboard offers better fire resistance than timber-based linings.
Draughts, Doors and Glazing
Insulation slows heat through solid surfaces, but draughts let warm air escape and cold air pour in, undoing much of your work. Sealing the gaps is cheap and makes an immediate difference.
- Doors - fit compression draught-excluder strip around the frame and a brush or blade seal along the bottom. Adjust hinges and latches so the door closes firmly against the seal.
- Windows - single glazing is a major weak point. Where you can, upgrade to double-glazed units, or at least seal the frames well and add heavy curtains or a thermal blind.
- Service penetrations - seal around any cable or pipe entries with foam or sealant so they do not become air leaks.
Remember to balance airtightness with a little controlled ventilation. A completely sealed, occupied room will build up humidity, so a trickle vent or the habit of opening a window for a few minutes keeps the air fresh and dry.
Common Mistakes to Avoid
Putting the vapour control layer on the cold side, or sealing both faces, traps moisture in the wall. Vapour control inside, breather membrane outside, every time.
Stuffing a cold roof full of insulation with no air gap removes the path for moisture to dry away. Keep at least 25mm to 50mm of vented gap above the insulation.
Loose-fitting boards and uninsulated studs let heat leak out and cold surfaces form. Cut insulation snugly and seal every edge with foam or tape.
Sealing insulation over a leaking roof or damp cladding locks moisture in. Fix the building envelope first, then insulate.
Summary
Insulating a shed for year-round use comes down to getting the layers right in every element:
- Floor - insulation between the joists, a vapour control layer, then an 18mm OSB or T&G chipboard deck
- Walls - insulation between the studs, breather membrane outside, vapour control inside, then your chosen lining
- Roof - insulate between the rafters with a vented gap (cold roof) or a continuous warm roof
- Vapour control inside, breather membrane outside - the single most important rule for avoiding interstitial condensation
- Draughtproof doors and glazing, and keep a little controlled ventilation
Get these right and your shed will stay warm, dry and comfortable through a British winter.
Planning a Year-Round Garden Room?
Use our free shed builder tool to design an insulated shed or garden office and get a complete materials list to match.
Start Building Now