How to Move a Shed: Intact, on Rollers or in Panels
Move a garden shed without turning it into firewood. How to assess the structure, prepare a safe route, use skids and rollers, dismantle cleanly, transport panels and set it down square.
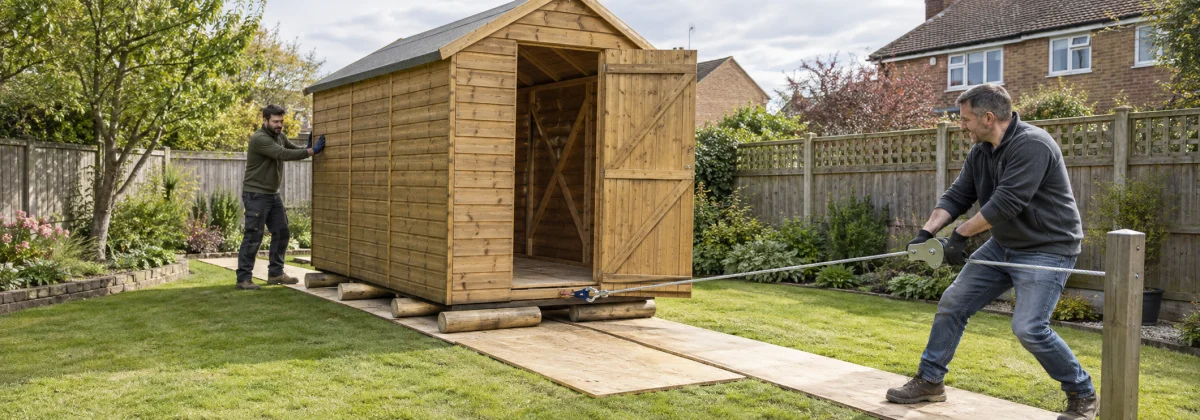
Moving a shed is not one heroic lift. It is a sequence of small, controlled decisions: decide whether the building is strong enough to travel, remove almost all of its weight, make the empty shell resist twisting, build a route that will not collapse, and keep the shed supported at every moment. Get those decisions right and a modest timber shed can cross a garden intact. Get one wrong and the floor bearers split, the door opening racks into a diamond and a useful building becomes a stack of awkward timber.
There are three sensible DIY methods. Roll the complete shed for a short, level move. Pull it on skids when the surface changes or the move needs more control. Dismantle it into panels for narrow access, weak structures or road transport. A fourth option—specialist lifting with a loader, HIAB or crane—is often the cheapest answer once the shed is large, the garden slopes or access is poor.
A supported shed is still a suspended load. Use solid timber cribbing whenever you raise it, keep hands and feet out of pinch points and never rely on a jack alone. If the shed, ground or equipment behaves differently from the plan, stop and lower it safely.
First Question: Is This Shed Fit to Move?
Size is obvious; condition matters more. A small rotten shed is more dangerous to move intact than a larger, well-framed one because the lifting force enters through the very timbers most likely to have failed: the floor bearers and bottom wall rails.
Empty it enough to inspect, then use a screwdriver to probe the bearer ends, the bottom 150mm of every corner, the threshold and the floor immediately inside the door. Sound timber resists and leaves a shallow mark. Soft fibres, a sweet damp smell, dark cuboidal cracks or a point that disappears into the wood mean decay. Sight along the ridge and wall tops. Open and close the door. If the doorway changes shape when the shed is nudged, the shell already lacks stiffness.
| What you find | Sensible method | Why |
|---|---|---|
| Sound 6x4 or 8x6, short level route | Skids and rollers | The complete shell can usually be braced and kept supported. |
| Sound shed, mixed lawn/gravel or a gentle change in level | Skids with a rated manual winch | Skids bridge small imperfections; the winch controls speed. |
| Narrow gate, sharp corner or road journey | Dismantle into panels | Panels are easier to protect, carry and restrain legally. |
| Rotten bearers, loose panels or sagging roof | Dismantle and repair | The structure cannot safely take concentrated lifting loads. |
| Large workshop, log cabin, insulated or lined building | Specialist mover | Weight, stiffness and lifting points are hard to verify from outside. |
How much does a shed weigh?
There is no useful standard weight. An inexpensive 6x4 overlap shed may be in the low hundreds of kilograms; an 8x6 tongue-and-groove building can be several hundred; a 10x12 workshop with a heavy floor, glazing and boarded roof may approach or exceed a tonne. Felt, EPDM, insulation, lining, benches and damp timber all add up. These are planning ranges, not lifting figures. The maker's specification or a component-by-component material estimate is the only responsible basis for choosing jacks, winches, straps and transport.
The HSE's manual-handling guidance is written for work, but its questions are exactly the right ones at home: consider the load, posture, carry distance, ground, visibility, individual capability and mechanical help. A four-person lift is not automatically safe simply because four people have arrived.
Build the Destination and the Route First
The new base must be finished before move day. A shed cannot wait overnight on rollers while concrete cures, and a hurried set-down onto loose blocks usually leaves it twisted. Use the existing shed foundation guide to choose and level the base, or the plastic grid guide where drainage and ground conditions suit one.
Measure the shed at the widest point, not just the nominal floor size. Roof overhangs, fascias, gutters and open door hardware are what catch a gatepost. Then walk the route with a tape and a long straight batten:
- Width: allow the shed's widest dimension plus working room. A route that is “exactly wide enough” is not wide enough to steer.
- Height: check eaves, tree branches, washing-line posts, telephone cables and pergolas. The ridge does not become shorter because attention is on the ground.
- Surface: fill hollows, remove stones and bridge soft lawn with continuous 18mm exterior plywood or proper ground mats. Loose boards kick up under rollers.
- Corners: mark the rear corners of the shed on the ground as it turns. The tail swings wider than the leading edge.
- Slope: even a gentle fall turns weight into motion. If the shed could run away when a roller moves, use a rated winch and secondary restraint or hand the job to a mover.
Photograph the empty route and nominate one person to direct the move. Everybody else follows that person's “move” and “stop”; four simultaneous plans are how fingers enter pinch points.
Empty, Disconnect and Brace the Shell
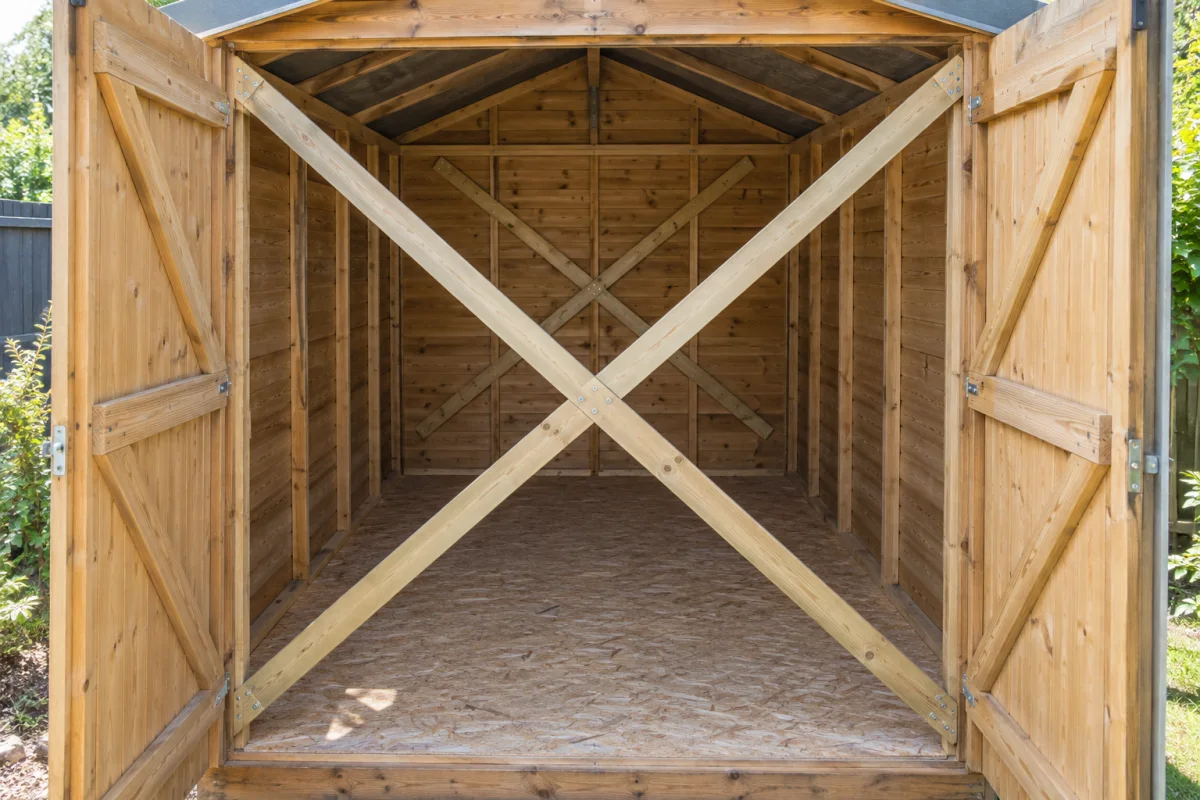
Take out everything that is not the building. A “light” half-full paint tin becomes a projectile; a workbench that feels fixed may be carrying 60kg in tools. Remove shelves, hooks, loose glazing, water butts and guttering. Take doors off only if their openings are separately braced. Tape opening windows shut and protect glass with rigid board on both faces, without taping directly to old glass.
Electrical work needs a clean break. Unplug a shed supplied by a removable lead. A fixed armoured cable must be isolated and disconnected by a competent electrician; do not drag it, cut it or assume the switch in the shed makes the buried cable dead. Disconnect plumbing, alarms and data cables deliberately and label each end.
Now brace the shed against racking. Screw straight 4x2 or substantial battens diagonally across the inside face of each wall panel, catching framing at both ends. Brace large door openings corner to corner. For a panel shed, add temporary ties across opposing walls if the roof construction does not already hold them together. Use screws so the bracing can be removed without hammering the moved building.
Old felt often tears where roof panels flex. Budget to replace it after the move rather than designing a dangerous lift around saving £30 of tired covering. Our roofing felt guide covers the clean finish.
Method 1: Move a Shed on Rollers
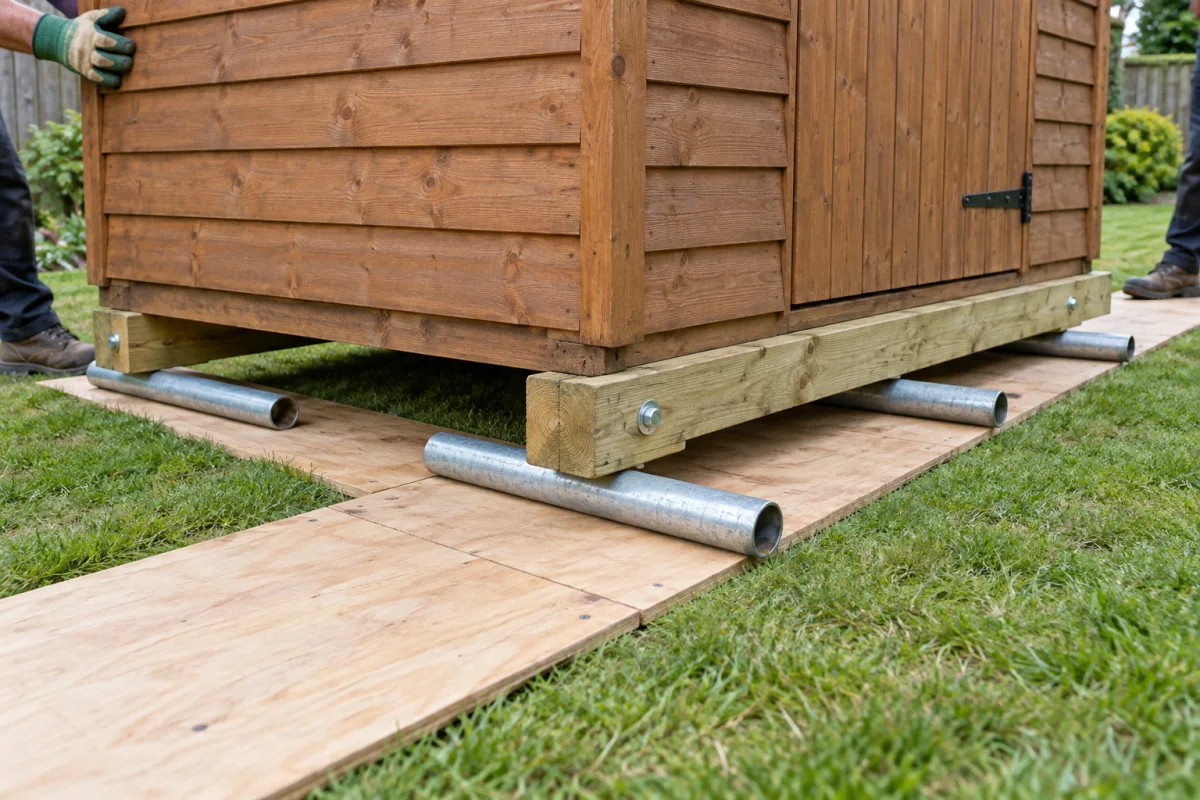
Rollers suit a short, nearly level move where the shed can remain facing the same way. Scaffold tube is predictable and durable; sound round timber of consistent diameter can work for a light shed. Do not use plastic waste pipe, broom handles or mixed offcuts: they crush, split or steer the load unexpectedly.
- Expose the structural bearers. Remove base trims and confirm where the floor load actually runs. Jack beneath those members, never beneath featheredge cladding or a thin floorboard.
- Raise one side a little. Use rated low-profile jacks on solid spreader pads. Lift 25 to 50mm, insert sound timber cribbing, then repeat at the other side. The shed remains supported if a jack loses pressure.
- Fit two continuous skids. Treated 4x4 or deeper structural timbers run in the direction of travel beneath the bearers and are mechanically fixed or securely restrained from sliding.
- Insert at least three rollers. They lie across the direction of movement. More rollers reduce point loads; three is the practical minimum because one is always being recovered from the back.
- Make the first controlled movement. Push only on the frame at low level or pull from both skids, not from a door handle. Move 150 to 300mm, stop, inspect the braces, skids and track, then continue.
- Recycle the rear roller. Once fully clear behind the shed, carry it around—not over or under the load—and place it squarely ahead.
- Lower in stages. At the destination, reverse the jacking and cribbing sequence so both skids settle evenly onto the prepared supports.
Rollers do not steer sharply. To alter direction, move in small increments and skew the leading roller by only a few degrees, correcting the following rollers. If the shed starts to walk off a skid or a roller turns diagonally, stop, crib the load and reset. Never kick a live roller into line.
Method 2: Skids and a Manual Winch
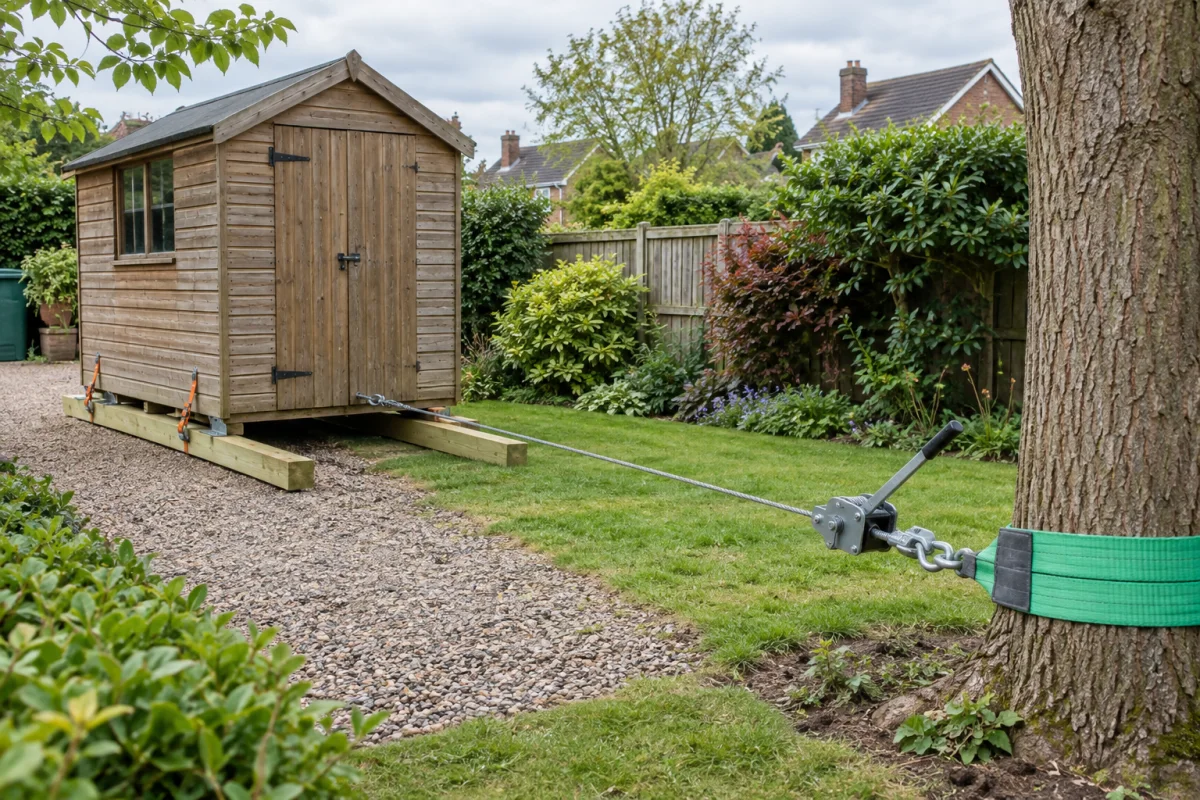
Skids are the shed-moving version of a sledge. Their upturned or chamfered leading ends ride over a prepared route; rollers can still sit beneath them on firm sections. The useful difference is that the shed and skids become one restrained unit, which is easier to pull across mixed surfaces.
Attach the pull to a rated bridle connecting both skids so the force stays central. Never winch from the wall frame, threshold, door hinges or one corner. The anchor must be genuinely structural and protected: a purpose-made ground anchor, a sound tree with a wide rated sling, or a vehicle positioned and secured by a competent operator. Never wrap bare cable or chain around a tree.
A manual cable winch or tirfor-type device gives far more feel than towing with a car. Take up the slack, clear everybody from the line of pull and from the downhill side, move a short distance, chock, then reset the route. A second rated restraint behind the shed is prudent on any slope. Do not stand over a tensioned cable; hardware failure releases stored energy quickly.
If the skids dig in, the answer is a better track or lower ground pressure, not more pulling force. Stop, crib the shed, extend the plywood or ground mats and check that the leading edges are not catching.
Method 3: Dismantle and Rebuild It
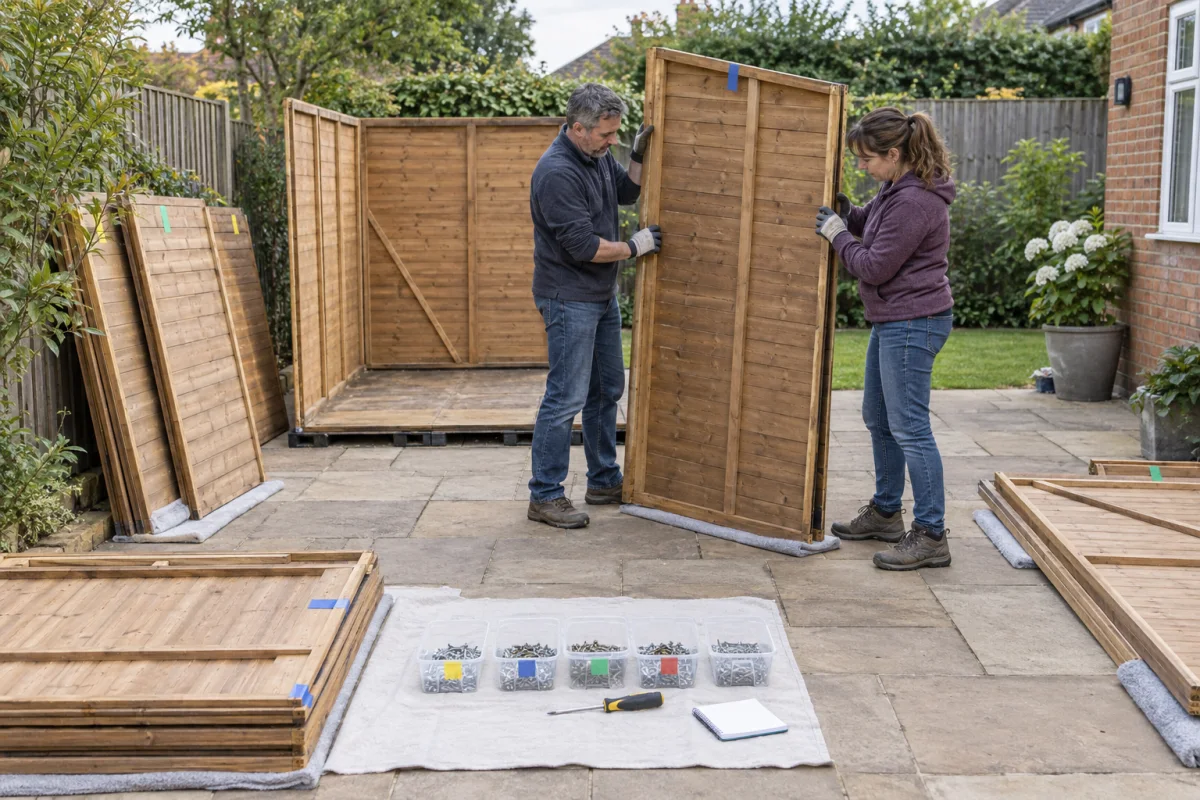
Dismantling is not the second-best method. For panel sheds it is often faster, safer and kinder to the building than forcing a complete shell through a garden. The trick is to treat it as a documented reverse assembly, not demolition.
- Photograph every elevation and corner. Include cable routes, trims, hinge positions and how roof panels overlap.
- Make a simple plan. Name the walls front, rear, left and right as viewed from outside. Mark the same codes inside each panel where weather cannot erase them.
- Remove fragile and projecting parts. Glazing, doors, fascias, finials, guttering and loose trims come off first and travel separately.
- Strip or release the roof covering. Old felt is normally sacrificed. With a membrane or sound felt, release the edges without bending them sharply.
- Take off roof panels. Support both ends. Then remove ridge members and any loose roof trusses in the order photographed.
- Brace the remaining walls. Two people hold each panel while a third removes fixings. Separate gables, then side and rear panels; the floor is last.
- Sort every fixing. Use one container per joint or colour code. Replace bent nails and corroded screws rather than preserving them for sentiment.
Keep wall panels upright on padded blocks or flat with full support; never lean a stack where wind can take it. If cladding projects below the frame, that delicate bottom edge does not carry the panel. A repaired, square base rail is far more important than saving every rusty fixing.
Taking Shed Panels on the Road
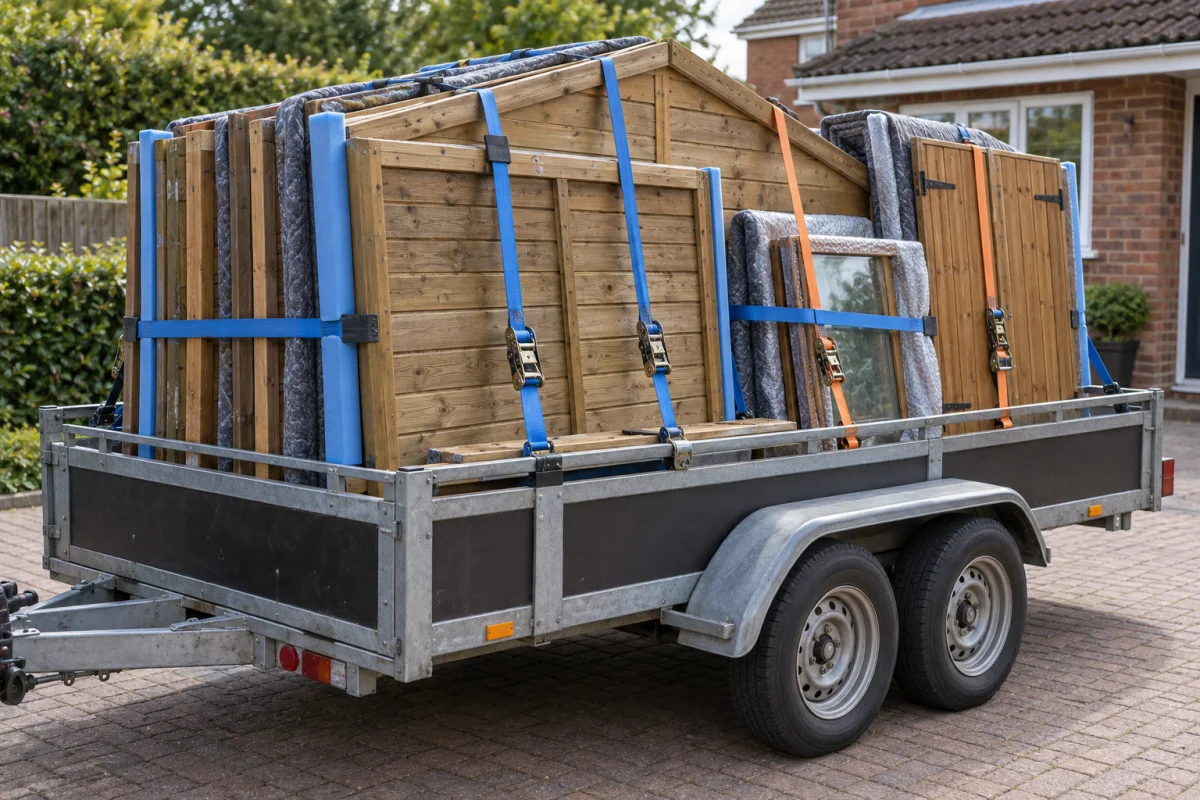
Measure the largest roof or wall panel before booking a van or trailer. Nominal 8x6 dimensions do not describe the gable height, roof overhang or length of a ridge timber. Check payload as well as deck size: the legal carrying capacity belongs to the vehicle or trailer specification, not to a guess based on how the suspension looks.
Flat panels need full support, padding between finished faces and edge protection beneath every strap. Upright panels need a proper rack or high sides and multiple independent rated restraints. Doors and windows travel separately; remove glass where the construction permits and sandwich it between rigid boards. Stop after the first few miles to recheck the load, because timber stacks settle.
For a shed you are buying or selling, decide in writing who dismantles, who loads, who insures the journey and who rebuilds. The companion guide to selling a shed covers handover and transport expectations from the other side of the gate.
Set It Down Square, Not Merely “In Place”
Lower the shed onto equal, continuous support. Check level along both directions, then measure the two floor diagonals; equal diagonals mean the rectangle is square. A door that latched before the move should latch again before any brace is removed. If it does not, adjust the supports rather than planing the door to fit a twisted building.
For a dismantled shed, assemble the floor square, stand and loosely connect the wall panels, fit the roof structure, then check plumb and diagonals before final tightening. Refit doors and windows only when the shell is stable. Replace damaged felt, reseal glazing and trim joints, reconnect guttering and keep splashback away from the bottom boards. The waterproofing guide is the final inspection list.
Remove temporary braces last. Reconnect fixed electrical supplies through a competent electrician, and update your insurer if the building use, value or security has changed.
When a Professional Move Is the Sensible DIY Decision
Hire a specialist when any of these are true: the building is insulated or lined so its frame cannot be inspected; it contains a log-cabin wall system; it is larger than a basic panel shed; the route slopes; the lift crosses a wall or house; machinery must enter a public road; overhead services are nearby; the destination needs a crane; or nobody can state the building's weight and the equipment's safe working load with confidence.
Ask the mover what is included: site survey, temporary bracing, electrical isolation, dismantling, new base, lifting plan, road access, insurance, roof repairs and waste. Send photographs and exact dimensions, but expect a serious firm to inspect awkward access in person. A cheap quote that assumes “four strong lads” is not a moving plan.
The best shed move is pleasantly uneventful. The route is ready, the shell stays square, nobody improvises under load and the door closes at the far end exactly as it did at the start.
Frequently Asked Questions
Can you move a shed without taking it apart?
Yes, if it is a small, structurally sound timber shed and the route is short, firm, level and unobstructed. Empty and brace the shed, support it beneath sound floor bearers, then move it on skids or rollers. Dismantling is safer for weak sheds, tight routes, steep ground and any road journey.
How heavy is a 10x12 shed?
A timber 10x12 workshop can weigh roughly 700kg to well over a tonne before contents, depending on cladding thickness, floor, roof covering, glazing and framing. Treat any online figure as an estimate: obtain the manufacturer specification or calculate the materials, and use a professional mover if the weight or structure is uncertain.
What can I use to move a shed?
For a short move, use sound timber skids, scaffold-tube or heavy round-timber rollers, a continuous plywood track, rated jacks, solid cribbing and a rated manual winch. Every component must have a known safe working load. Never improvise with garden canes, loose bricks, shopping trolleys or a vehicle tow.
How do you move a shed without skids?
Dismantle it into roof, wall and floor panels, label everything and carry the panels to the new base. For a very small shed on firm level ground, correctly rated machinery may lift it from its structural bearers, but that is a professional job rather than a hand-lifting shortcut.
How much does it cost to move a shed?
Cost depends more on access and method than distance. A local handyperson team may dismantle and reassemble a simple panel shed for a few hundred pounds; specialist winch, trailer or crane work can cost substantially more. Ask for a site visit and a written scope covering the new base, roof covering, transport and disposal of failed timber.
Can I move a rotten shed?
Not intact. Rot at the floor bearers, bottom rails or corners removes the load path needed for lifting. Dismantle cautiously, salvage only sound panels and timber, and rebuild the failed sections on the new base. If the roof or walls move independently, stop and make the structure safe before continuing.
Build the new position before move day
Set the exact footprint, choose the construction and generate a materials list before the old shed leaves its base.
Plan the shed position →